Creating and publishing a video with the Kaltura Video Editor allows you to turn raw footage into clear, engaging, and structured visual content. Whether it’s for a course, presentation, or internal communication, editing ensures the final video delivers the right message.
Kaltura’s built-in editor helps refine recordings by trimming, enhancing, and organizing clips before sharing them. Understanding how to prepare and publish your video properly ensures that viewers receive a polished and accessible version suited for its intended purpose.
Prerequisites
- A Video Cloud account with access to the Gallery module
- Working knowledge of Video Cloud
- The sample videos used in this topic are available for download if needed
- Helpful to view/attend the Building Portal Experiences using the Gallery training
Before You Get Started
To use the sample videos provided, follow these steps.
Step 1: Download the sample files.
Step 2: Upload the videos to your Video Cloud account.
Step 3: Add a 'bird in flight' tag to the Chickadee video.
Step 4: Create three playlists and add the videos to the playlists as follows.
| Video | Playlist |
| Clown Fish | Sea Creatures |
| Crab | Sea Creatures |
| Dolphins | Sea Creatures |
| Leafy Seadragon | Sea Creatures |
| Lionfish | Sea Creatures |
| Sea Turtle | Sea Creatures |
| Seahorse | Sea Creatures |
| Chickadee | Birds |
| Peacock | Birds |
| Woodpecker | Birds |
| Elephant | Birds |
| Tiger | Animals |
| Zebra | Animals |
Step 5: Add some related link URLs to a few of the videos. In a later section, we will configure the portal to display related links for videos.
Step 6: Using the “Players” module, create a new player called “Gallery Player”.
Step 7: Configure the player to NOT display the title and description. Publish the player.
Creating a Portal Experience
To create a Portal Experience using Brightcove Gallery, you will complete the following tasks:
- Configure Gallery with a Default Player
- Create a Custom Domain Name
- Create a New Portal Experience
- Edit the Site Details
- Add Objects to a Page Template
- Preview the Experience
- Create Collections and Add Videos to the Collections
- Change the Site Style
- Enable Site Search
- Customize the Social Settings
- Customizing Video and Playback Settings
- Assign a Custom Domain
- Publish the Experience
Configuring Gallery with a Default Player
Brightcove Gallery can be configured with a default video player that will be used on your Gallery sites. If no default player is specified, the “Brightcove Default Player” will be the default. To configure Gallery with a default player, follow these steps.
Step 1: Log in to Video Cloud Studio.
Step 2: The current Video Cloud account name will appear in the upper right corner of the page. If you have multiple accounts, click the account selector drop-down and select the account you would like to create the experience in. Note that this should also be the account that has the videos you want to use as well.
Step 3: In the primary navigation, click on the “Gallery” option.
Step 4: Click on the “Settings” icon () at the top of the page.
Step 5: Select the player that will be used on your Gallery sites. If you are following the steps, select the “Gallery Player” you created earlier.
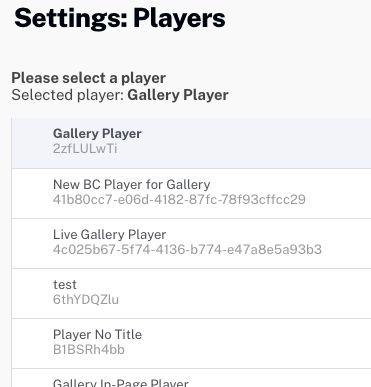
Note: As a best practice, we recommend you create and style dedicated players for your Gallery experiences.
Step 6: Click on the “Save” Button.
Creating a Custom Domain Name
When you create a new Portal Experience, Gallery will assign a random URL to it (i.e., site-12345.bcvp0rtal.com). Portal Experiences can be assigned a Brightcove-provided domain (what we will do in this topic), or you can use your own custom domain. To create a new Brightcove-provided domain, follow these steps.
Step 1: From the “Settings” page, click on the “Custom Domains & SSL” option in the left navigation.
Step 2: Click on “Create Custom Domain”.
Step 3: Select either a “brightcovegallery.com” or “gallery.video” domain.
Step 4: Enter a custom domain and use your own name or company name. If the domain is not available, a message will display. Enter another name.
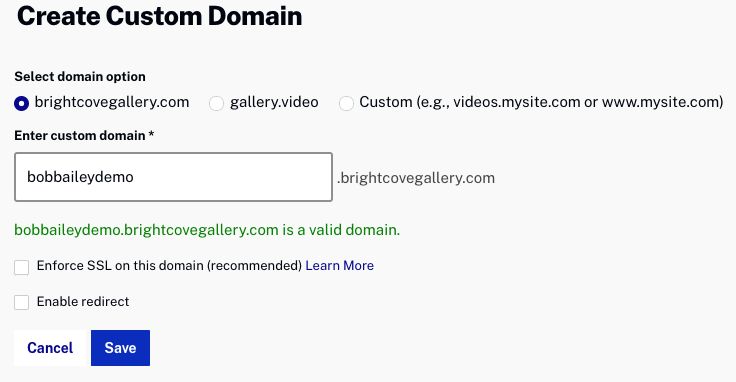
Step 5: When you have entered a valid domain, click on the “Save” button.
Step 6: Click on the “Back to All Experiences” link at the top of the page.
Note: The custom domain will be assigned to the portal in a later section.
Creating a New Portal Experience
To create a new Gallery Portal Experience, follow these steps.
Step 1: Click on the “New Experience” button.
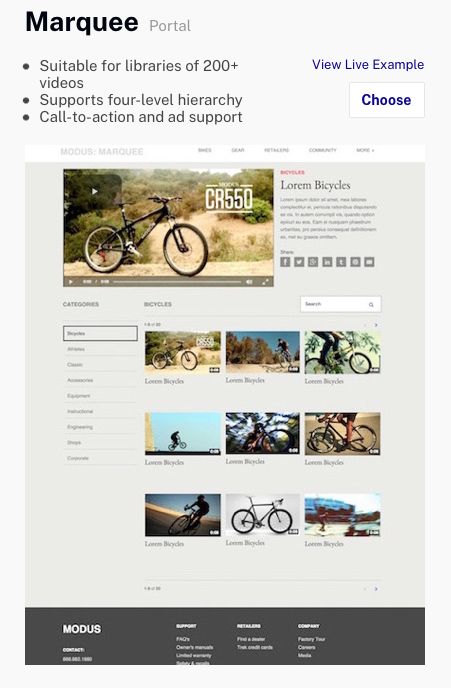
Step 2: Click on the Portal tab at the top of the page. A list of Portal templates will be displayed. Locate the Marquee template and click Choose.
Note: Once you select a template, it can't be changed. For more information on Gallery templates, see the Overview of Gallery Portal Templates topic.
Step 3: Enter “Animal World” for the “Experience Title”. For the “Pre-Populate experience?” Setting, select the “No Thanks” option.
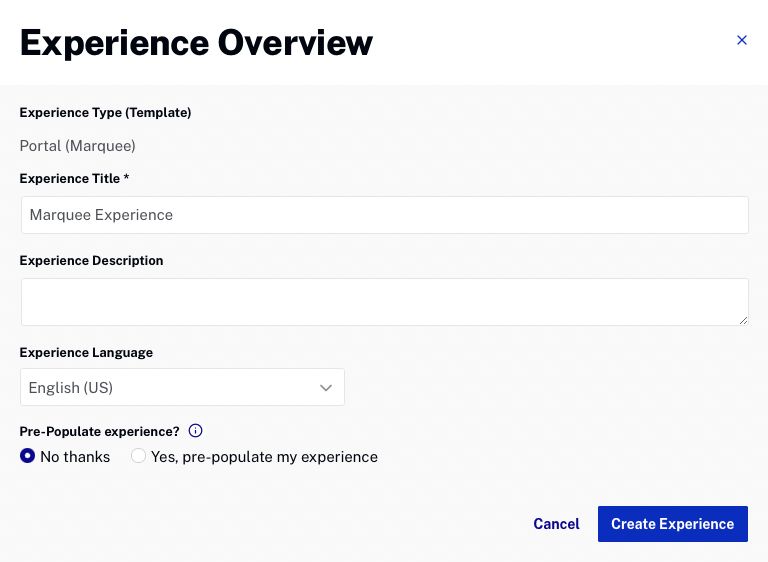
Step 4: Click on the “Create Experience” button.
The Gallery Site Editor will open. The Gallery Site Editor is used to customize the experience and provides the ability to manage page layouts, add videos, choose styles, and configure other settings for the portal. All of the customization settings are accessed using the left navigation menu.
Editing the Site Details
The experience title, description, and language settings can be edited using the Gallery Site Editor.
Step 1: Click on the “Overview” option in the left navigation. For the “Experience Description”, add “Animal World Video Portal”.
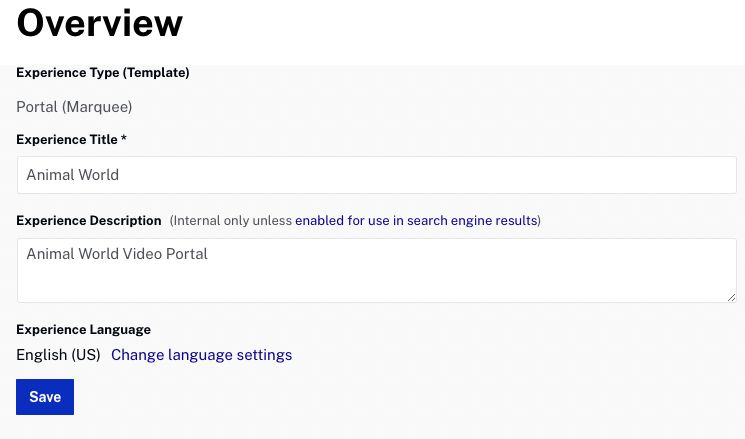
Step 2: After adding “Animal World Video Portal”, click on the “Save” button.
Adding Objects to a Page Template
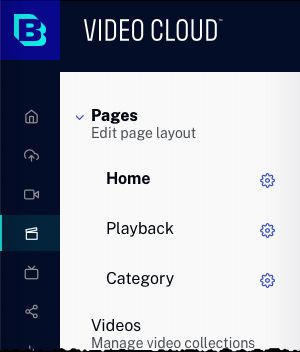
Each Portal template provides a set of page templates that can be customized. The page templates that are provided depend upon the template that was selected when the experience was first created. The Marquee template provides “Home”, “Playback”, and “Category” page templates. These pages can be seen in the left margin as part of the “Pages” menu.
For more information on adding objects to page templates, see Customizing the Content of Portal Experience Pages. To add objects to a page template, follow these steps.
Step 1: Click on the “Pages” option in the left navigation.
Step 2: Click the “Home” page in the left margin. Plus icons () indicate areas on the page where objects can be added. Static text objects on the page can be edited by clicking on them.
Step 3: At the top of the page, click on the “+ Add Image or Text” button.
Step 4: Click on the “Image” tab.
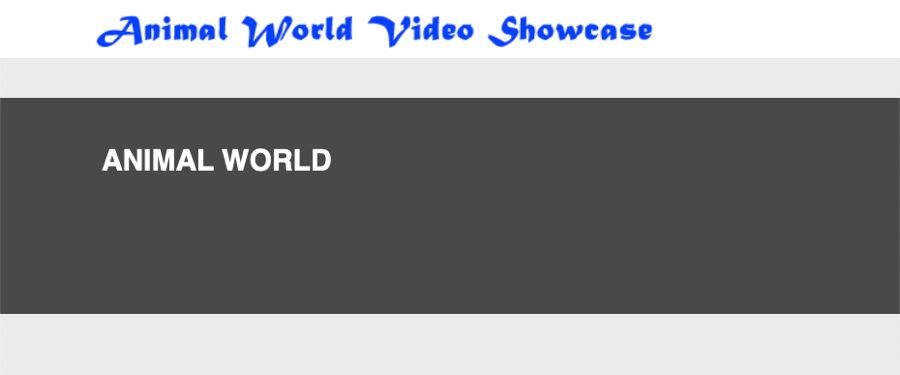
Step 5: Click on the “browse” and then browse and select the “Animal World Logo.png” option. This file is provided as part of the sample assets. Click on the “Save” button.

Step 6: Verify that the image appears in the page header.

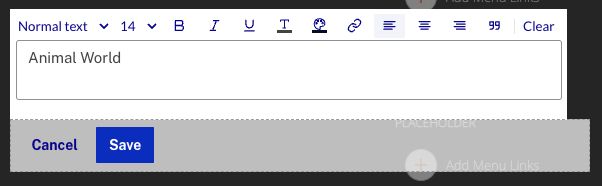
Step 7: Scroll to the bottom of the page. Click on [YOUR BRAND]. Enter “Animal World” for the title and then click on the “Save” button.
Step 8: Click on the “Playback” and “Category” pages in the left margin. Notice that the header image and title text appear on those pages as well. Go back to the “Home” page.
Note: Having “_728_90” in the file name will cause the image to be blocked by most ad blockers.
Previewing the Experience
Previewing an experience lets you see how the portal is going to display on mobile, tablet, and desktop devices. You will want to preview the portal as you go through the steps to customize it. The portal can be previewed in a new browser tab, or a shareable link can be generated so others can preview the portal.
For more information on previewing and publishing a Portal Experience, see Previewing and Publishing a Portal Experience.
To preview the portal, follow these steps.
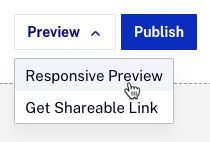
Step 1: While editing the site using the Gallery Site Editor, click on the “Preview” option and then click on the “Responsive Preview” option.
Step 2: The preview will open in a new browser tab.
Step 3: Close the site preview tab.
Creating Collections and Adding Videos to the Collections
Using the Gallery Site Editor, you can select which videos to display on the portal. When creating a Portal Experience, videos are organized into collections. Collections are created based upon Video Cloud video metadata and can include:
- Video Cloud playlists
- Keywords
- Custom metadata
- Tags
Videos from a YouTube account can also be added to collections. For more information on creating collections and adding videos to your site, see Adding Videos to a Portal Experience.
To add videos to a Portal Experience, follow these steps.
Step 1: Click on the “Videos” option in the left navigation.
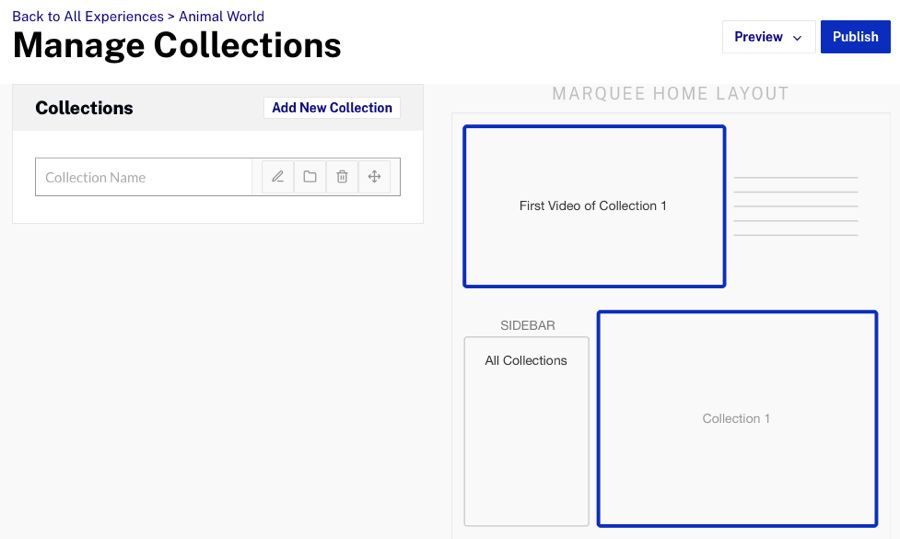
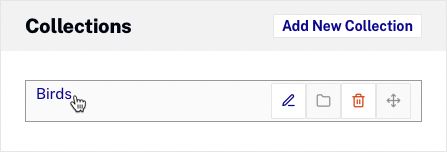
Step 2: Name the first collection “Birds”, and then hit the “Enter” key.
Step 3: Click the collection name to open the collection editor.
Step 4: Select “Brightcove” for the Collection Source and select Playlist for the criteria.
Step 5: Click the Birds playlist. All of the videos in the Birds playlist will appear in the videos list. Click on the “Save” button.
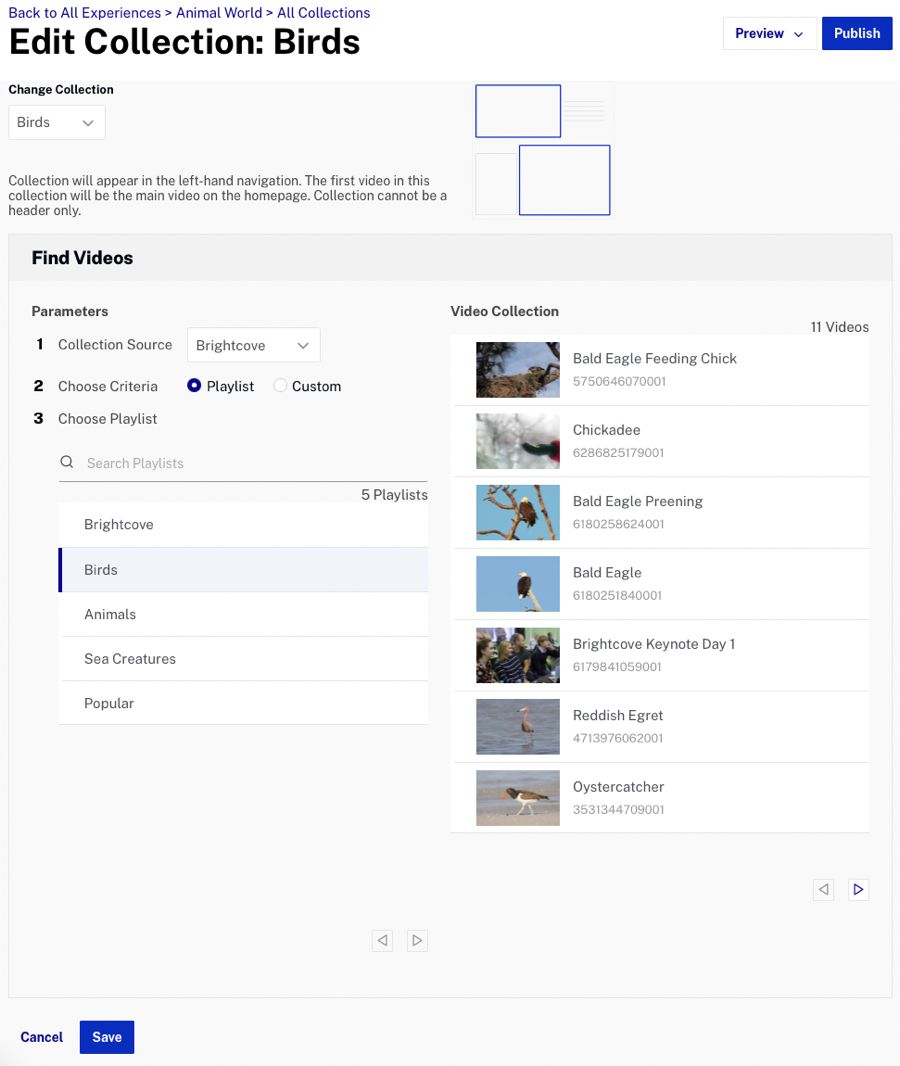
Note: When using a playlist video assignment, the order of the videos is based on the playlist settings that were set in the Media module.
Step 6: Create another collection named “Animals” using the “Animals” playlist as the criteria.
Step 7: Create another collection named “Sea Creatures” using the “Sea Creatures” playlist as the criteria.
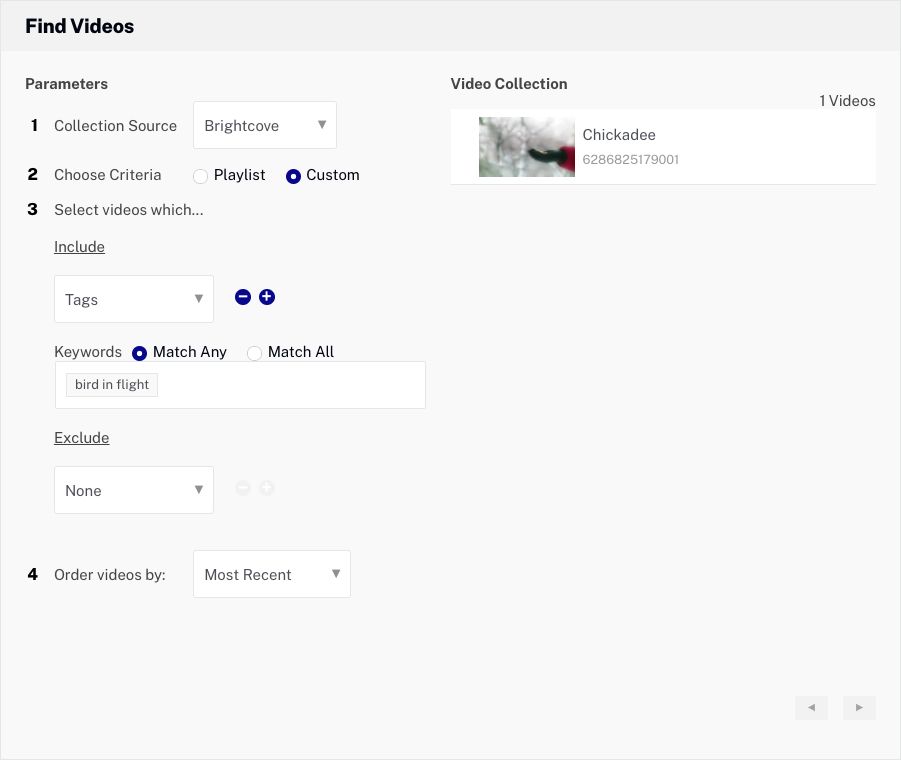
Step 8: Create another collection named “Birds in Flight” and select the “Custom” option as the criteria.
Step 9: For the videos to include, select “Tags” and add the “bird in flight” tag. Hit the “enter” button after that.
Step 10: Order videos by the “Most Recent” filter.
Step 11: Confirm the Chickadee video appears in the Video Collection list. Click on the “Save” button.
Step 12: Confirm that 4 collections have been created.
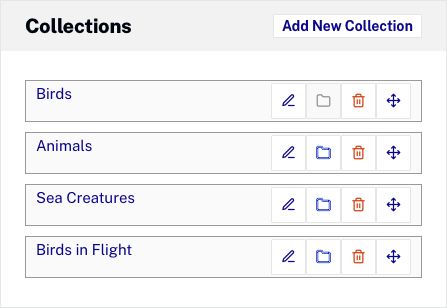
Note: You can change the order of the collections by clicking and dragging the collection to a new position.
Changing the Site Style
The Style settings can be used to customize the site colors and fonts that are used on the experience. For more information on changing the site style, see Customizing the Style of a Portal Experience.

If you want to change the style of your website, you need to follow the steps below.
- Click Style in the left navigation.
Step 1: A Theme is a set of colors and fonts that can be applied to a template. Select a Theme, then this portal will use the Triton theme.
Step 2: Select a Primary and Secondary font to use. This portal will use the Open Sans font.
Step 3: Click on the “< Back to Experience” link at the top of the style menu.
Additional styling-related settings are also available as part of the Appearance and Behavior settings.
Step 4: Click on the “Appearance and Behavior” then on the “Template Settings” options in the left navigation.
Step 5: Select the “Change the Featured Video to the First Video of the Selected Category” option and click on the “Save” button.
Note: The Template Settings that are available are based on the template that was selected when the experience was created. Not all templates have template settings.
For more information on the appearance and behavior settings, see Customizing the Appearance and Behavior of a Portal Experience.
Enabling Site Search
The Site Search settings can be used to enable and customize site search capabilities. By enabling site search, search capabilities will be added to the site pages, giving viewers a way to search your content. For more information on customizing site search, see Customizing the Site Features of a Portal Experience.
To enable site search, follow these steps.
Step 1: Click on the “Site Features” then on the “Site Search” button in the left navigation.
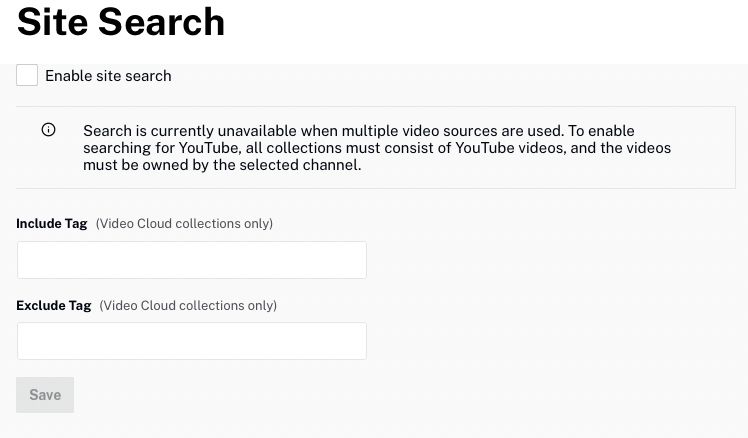
Step 2: Check the Enable site search option.
Step 3: Click on the “Save” button to save the settings.
Customizing the Social Settings
The Social settings provide viewers with a way to share their content on popular social media sites. You can provide a way for viewers to access your social media sites. For more information on customizing the social settings, check out Customizing the Social Settings for a Portal Experience.
To configure the Social settings, follow these steps.
Step 1: Click on the “Site Features” button, then the “Social” button in the left navigation.
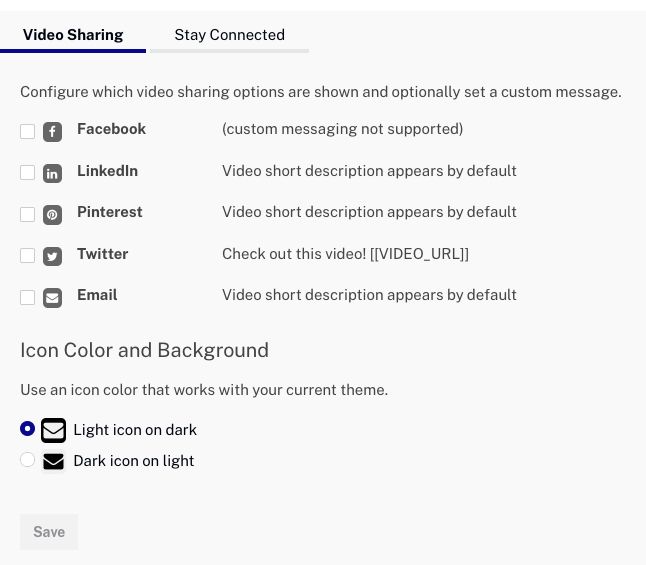
Step 2: Select all of the Sharing Options. This will add social sharing icons next to the player.
Step 3: Select the Dark icon on the light option, then click on the “Save” button.
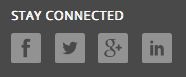
Step 4: Click on the “Stay Connected” tab at the top of the page. By supplying your social media account information, the Gallery site will display icons in the footer of pages, giving viewers direct access to your social media sites.
Step 5: Enter your social media information, or just enter brightcove for the Facebook Name, Twitter handle, and LinkedIn Username.
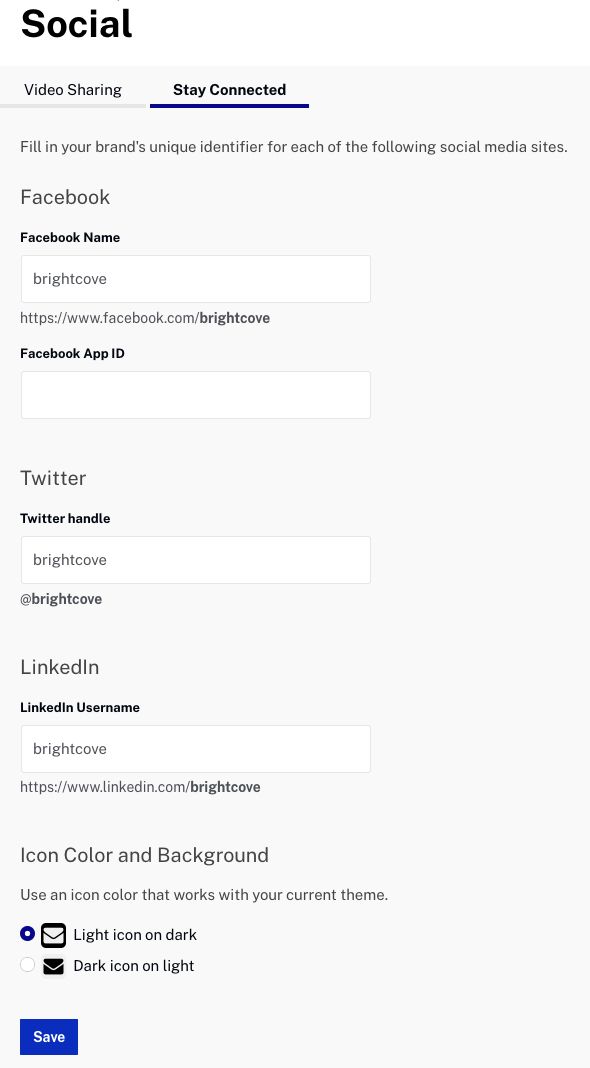
Step 6: Select the “Light Icon on the Dark” option, then click on the “Save” button to save the settings.
Customizing Video and Playback Settings
The Video and Playback settings can be used to select a custom player for the experience, add a lead form, and customize other video-related settings. For more information on customizing the social settings, see Customizing the Video and Playback Settings of a Portal Experience.
To customize the Video and Playback settings, follow these steps:
Step 1: From the Gallery Site Editor, click on the “Video and Playback” option, then on the “Player and Lead Form” option.
Step 2: Ensure that all of the Player Behavior settings are checked. Click on the “Save” button. if needed.
Step 3: Click on the “Video and Playback” button, then click on the “Video” option in the left navigation.
Step 4: Select the “Show Related Link for Each Video” option, then click on the “Save” button.
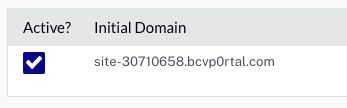
Assigning a Custom Domain
When Portal Experiences are created, they are assigned a random, static URL. In most cases, you will want to access the site at a more friendly URL. For more information on assigning a custom domain to a Portal Experience, see Assigning a Custom Domain to a Portal Experience.
To view the URL assigned to a portal and assign a custom URL, follow these steps:
Step 1: From the Gallery Site Editor, click on the “Site Configuration” > “URL” options. The URL assigned to your website will be displayed.
Step 2: Click on the “Add Custom Domain” button.
Note: If there is no Add Custom Domain button, no custom domains have been created.
Step 3: Select the domain you created earlier.
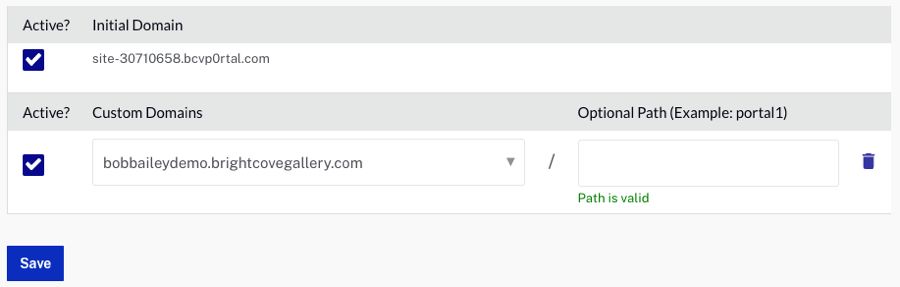
Step 4: Click on the “Save” button.
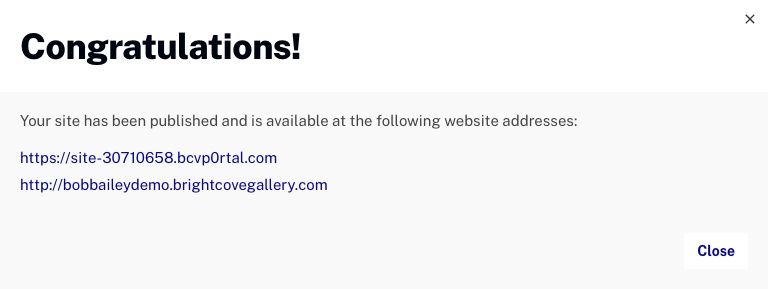
Publishing the Experience
Publishing a Portal Experience makes the experience available at a public URL. For further information on previewing and publishing a Portal Experience, see Previewing and Publishing a Portal Experience.
To publish the experience, follow these steps.
Step 1: From the Gallery Site Editor, click on the “Publish” button.
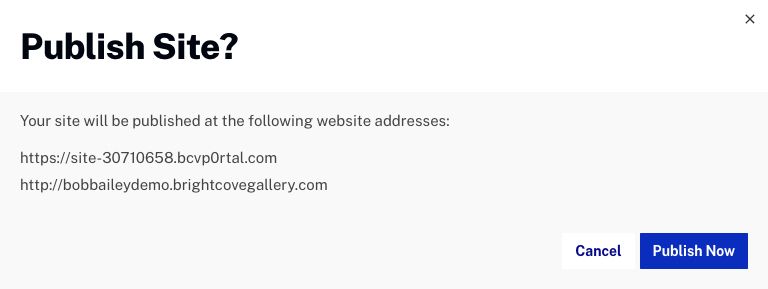
Note: The custom domain you assigned to the site should be listed in the dialog.
Step 2: On the Publish Site dialog, click on the “Publish Now” button to confirm the site publication.