In modern web development, leveraging Content Delivery Networks (CDNs) for video hosting is a common practice to ensure fast, reliable delivery of media content. Headless Content Management Systems (CMS) are increasingly becoming the backbone of dynamic websites and applications due to their flexibility and scalability. However, one of the key challenges in integrating videos into headless CMSs is linking and managing CDN-hosted videos effectively within the CMS architecture.
Understanding CDN-hosted Video Integration
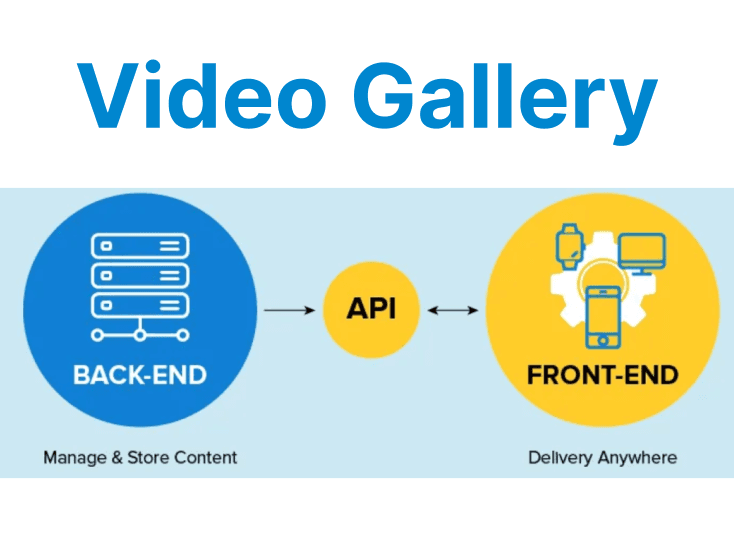
Headless CMSs manage content as raw data, storing it in a way that is independent of the front-end presentation layer. With CDN-hosted videos, the media files are stored on a content delivery network, which ensures they are served from geographically dispersed servers for optimal performance. Linking such videos within a headless CMS involves providing URLs or references to the videos hosted on the CDN.
The main challenge here is to structure the CMS to include video metadata (e.g., file format, resolution, file size) along with the media URL, ensuring that the CMS can efficiently handle, store, and retrieve video content.
Step 1: Setting Up CDN for Video Hosting
Before linking CDN-hosted videos in the CMS, ensure that your CDN provider is properly set up for video content delivery. Most modern CDNs, such as Cloudflare, AWS CloudFront, or Akamai, are optimized for media delivery. These services cache the content at edge locations to reduce latency and improve video loading times globally.
Here is an example of setting up CloudFront to host and deliver video content:
aws cloudfront create-distribution \
--origin-domain-name myvideos.s3.amazonaws.com \
--default-root-object index.html \
--enabled \
--http-version http2
This configuration will create a CloudFront distribution that serves videos hosted on an S3 bucket. By using such configurations, you can ensure that video files are available globally with minimal latency.
Step 2: Storing Video Metadata in a Headless CMS
Once the CDN is configured, the next step is to store the video’s metadata in the headless CMS. Metadata may include the video URL (hosted on the CDN), title, description, thumbnail, and file formats.
For example, in a CMS like Strapi, you can create a model for videos that stores all relevant data. Here’s how you might define a simple video model:
module.exports = {
attributes: {
title: {
type: 'string',
required: true,
},
description: {
type: 'text',
required: true,
},
video_url: {
type: 'string',
required: true,
},
thumbnail: {
type: 'string',
},
format: {
type: 'string',
},
},
};
Explanation:
- video_url: Stores the URL of the CDN-hosted video.
- Thumbnail: Can store the URL to a video thumbnail image for quick previewing.
- Format: Describes the video format (e.g., MP4, WebM, etc).
Once this model is created in the CMS, you can use it to manage and retrieve the metadata for each video hosted on your CDN.
Step 3: Linking Videos in Your Headless CMS
After setting up your CMS model and storing the necessary metadata, linking the videos involves referencing the CDN-hosted video URLs in the CMS content. When adding a video entry to your CMS, the video URL should point directly to the CDN-hosted video.
In a typical headless CMS workflow, you would use the video’s URL to fetch and display the video on the front end. Here is an example using a JavaScript framework like React:
const VideoPlayer = ({ videoUrl, thumbnail }) => (
<div className="video-player">
<img src={thumbnail} alt="Video thumbnail" />
<video controls>
<source src={videoUrl} type="video/mp4" />
Your browser does not support the video tag.
</video>
</div>
);
Expanation:
- videoUrl: Is dynamically fetched from the CMS and points to the video file hosted on the CDN.
- thumbnail: Is displayed as a preview image before the video is played.
Step 4: Optimizing Video Loading and Playback Performance
When linking CDN-hosted videos in a headless CMS, performance optimization is crucial. Here are some strategies to improve video delivery and playback:
1. Adaptive Bitrate Streaming (ABR)
For high-quality video delivery, especially in environments with varying network conditions, enable adaptive bitrate streaming. Technologies like HLS (HTTP Live Streaming) or DASH (Dynamic Adaptive Streaming over HTTP) allow for automatic quality adjustments based on the user's internet speed.
To enable ABR with CDN-hosted videos, make sure your video files are encoded in multiple bitrates and delivered through the CDN. For example, CloudFront can deliver HLS streams:
Example:
aws cloudfront create-distribution \
--origin-domain-name myvideos.s3.amazonaws.com \
--streaming-distribution \
--http-version http2
Explanation:
- aws cloudfront create-distribution: Creates a new CloudFront distribution.
- --origin-domain-name myvideos.s3.amazonaws.com: Sets the origin of the distribution to the specified S3 bucket.
- --streaming-distribution: Indicates the distribution is for streaming media content.
- --http-version http2: Configures the distribution to use HTTP/2 for faster performance.
2. Caching Strategies
CDNs typically cache video content at edge locations for faster delivery. However, fine-tuning cache expiration and cache invalidation policies is critical for ensuring fresh content delivery while minimizing latency. For example, setting a short cache expiration for frequently updated videos ensures that the most recent version is served.
Here’s an example configuration for setting cache-control headers on video files:
Example:
aws s3 cp myvideo.mp4 s3://mybucket/ --metadata-directive REPLACE --cache-control "max-age=86400, public"Explanation:
- aws s3 cp myvideo.mp4 s3://mybucket/: Uploads myvideo.mp4 to the S3 bucket named mybucket.
- --metadata-directive REPLACE: Replaces existing metadata with the new values provided.
- --cache-control "max-age=86400, public": Sets browser and CDN caching rules to allow public caching for 24 hours (86400 seconds).
This command sets a 24-hour cache expiration (max-age=86400) for the video file, ensuring that the CDN refreshes the content regularly.
3. Lazy Loading
To further optimize performance, use lazy loading for videos. This technique ensures that videos are only loaded when they come into the user’s viewport, reducing the initial load time of your webpage.
Example using IntersectionObserver for lazy loading video elements:
const videoElement = document.querySelector('video');

const observer = new IntersectionObserver((entries, observer) => {
entries.forEach(entry => {
if (entry.isIntersecting) {
const videoSource = entry.target.querySelector('source');
videoSource.src = videoSource.getAttribute('data-src'); // Load the video source lazily
entry.target.load();
observer.unobserve(entry.target);
}
});
}, { threshold: 0.5 });

document.querySelectorAll('video').forEach(video => observer.observe(video));
Explanation:
- videoElement: Selects the first <video> element in the document.
- observer: Creates an IntersectionObserver to monitor when videos enter the viewport.
- entry.isIntersecting: Checks if the video is visible in the viewport (at least 50% in view).
- videoSource.src = videoSource.getAttribute('data-src'): Lazily sets the video source from a data-src attribute.
- entry.target.load(): Loads the video once the source is set.
- observer.unobserve(entry.target): Stops observing the video after it's loaded.
- observer.observe(video): Begins observing each video element on the page.
This code ensures that video files are only fetched when they are 50% visible in the user’s viewport, reducing bandwidth usage.